


Stone Setting Techniques: Expert Tips to Elevate Your Jewelry Craftsmanship
Are you a jewelry artisan looking to take your craftsmanship to the next level? Mastering stone setting techniques is essential for creating stunning and durable pieces that stand out from the crowd. In this article, we will share expert tips to help elevate your jewelry craftsmanship and achieve professional-quality results.
From prong settings to bezel settings, the way you secure gemstones in your jewelry can greatly impact its overall appearance and durability. Our expert tips will guide you through different stone setting techniques, providing step-by-step instructions and insights into choosing the right method for your designs. We'll also cover essential tools and materials you'll need to achieve precise and secure stone settings.
Whether you're a beginner looking to enhance your skills or an experienced jeweler wanting to explore new techniques, this article is for you. Discover the secrets of expert stone settings and create breathtaking jewelry pieces that will leave a lasting impression on your customers. Get ready to take your craftsmanship to new heights with these invaluable tips and techniques.
So, let's dive in and elevate your jewelry craftsmanship with expert stone-setting techniques!
Importance Of Stone Setting In Jewelry Craftsmanship
Stone setting is a crucial element of jewelry craftsmanship. It not only enhances the beauty and visual appeal of the piece but also ensures the stones are securely held in place. A well-executed stone setting can make all the difference in creating a piece that stands out from the rest.
When it comes to stone setting, precision is key. A poorly set stone can easily become loose or even fall out, leading to disappointment for both the artisan and the customer. By mastering stone setting techniques, you can create jewelry that is not only aesthetically pleasing but also durable and long-lasting.
Proper stone setting also allows for maximum light reflection, making the gemstones sparkle and shine. Whether you're working with diamonds, sapphires, or any other precious gemstone, the right stone setting technique can enhance their brilliance and beauty.
To achieve professional-level craftsmanship, it's essential to familiarize yourself with different stone-setting techniques. Let's explore some of the most common types of stone settings and learn how to master them.
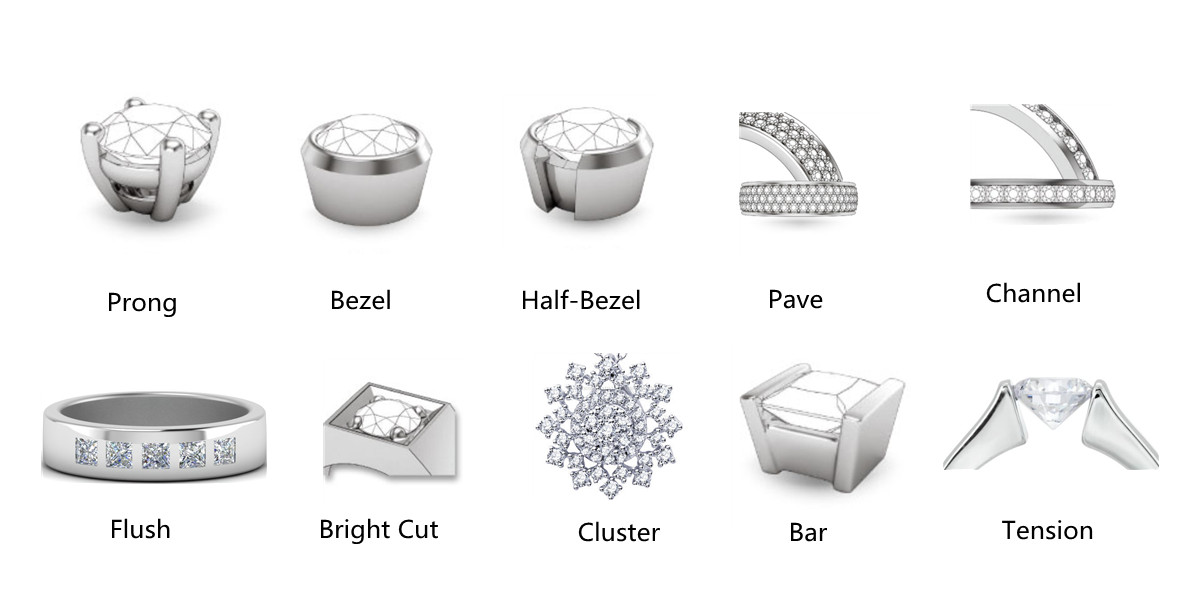
Common Types Of Stone Settings

Prong setting: A step-by-step guide
Prong setting is one of the most versatile and widely used stone setting techniques. It involves using metal prongs to secure the gemstone in place. Prong settings allow for maximum light exposure, showcasing the stone's brilliance from all angles.
To start, gather the necessary tools and materials: a gemstone, prong settings, a jeweler's saw, needle files, and a torch. Begin by measuring and marking the position of the prongs on the metal base. Use a jeweler's saw to create notches for the prongs to sit in. Carefully fill and shape the prongs to ensure a secure fit around the stone.
Next, place the stone in the setting and use a pair of pliers to carefully bend the prongs over the gemstone, making sure they are evenly spaced and hold the stone firmly in place. Trim any excess prong length and polish the prongs to achieve a professional finish.
Prong settings are ideal for showcasing larger gemstones, as they allow for maximum visibility and light play. However, it's important to ensure that the prongs are well-made and properly aligned to prevent any damage to the stone.
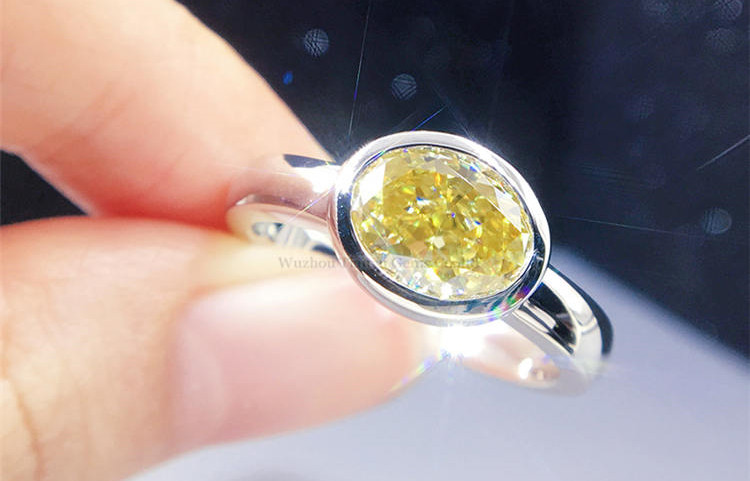
Bezel setting: Techniques for a secure and polished look
Bezel setting is a popular choice for jewelry artisans looking to create a clean and polished look. This technique involves encircling the gemstone with a metal strip, creating a secure and protective setting.
To begin, gather the necessary tools and materials: a gemstone, bezel wire, a jeweler's saw, files, and a torch. Measure the circumference of the stone and cut a strip of bezel wire slightly longer than the measured length. File the ends of the wire to create a neat and precise fit.
Next, shape the bezel wire into a circle or oval, depending on the shape of the stone. Use a jeweler's saw to create a small gap in the bezel wire, allowing it to be easily adjusted to fit the stone. Place the stone in the bezel setting and gently push the metal strip over the edges of the stone, ensuring a snug fit.
Once the stone is securely held in place, use a burnisher to smooth and polish the metal around the stone, creating a clean and professional finish. Bezel settings are particularly suitable for fragile or irregularly shaped gemstones, as they provide excellent protection and security.
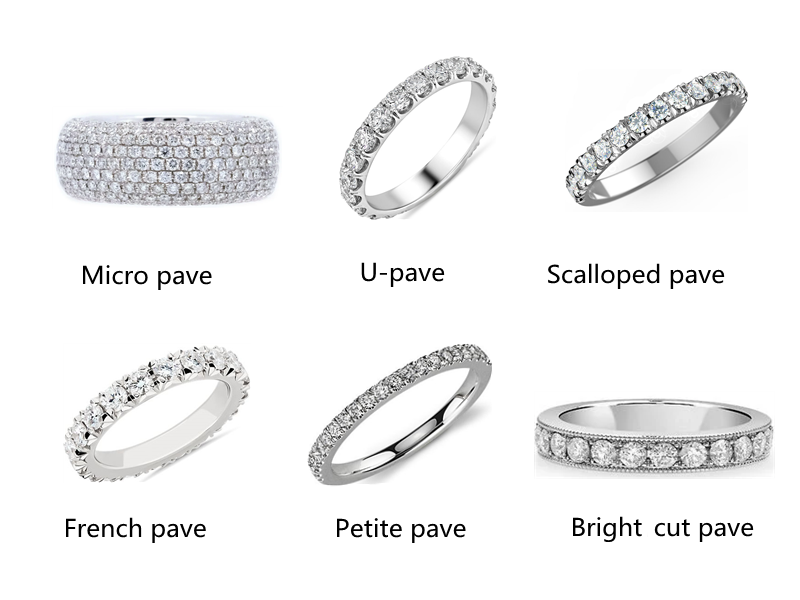
Pavé setting: Creating a dazzling effect with tiny stones
Pavé setting involves setting multiple small stones closely together, creating a continuous surface of sparkling gemstones. This technique is commonly used to add a touch of glamour and brilliance to jewelry pieces.
To begin, gather the necessary tools and materials: small gemstones, a burin or setting tool, a graver, and a burnisher. Start by creating small holes or recesses in the metal surface using a burin or setting tool. The holes should be slightly smaller than the gemstones to ensure a secure fit.
Next, carefully place the gemstones in the holes, using a graver to push them into position. Make sure the stones are tightly packed together, with no gaps or overlaps. Once all the stones are in place, use a burnisher to smooth and secure the metal around the gemstones, creating a seamless and dazzling surface.
Pavé settings are commonly used in engagement rings, earrings, and other jewelry pieces where a continuous sparkle is desired. This technique requires precision and attention to detail to achieve a flawless result.
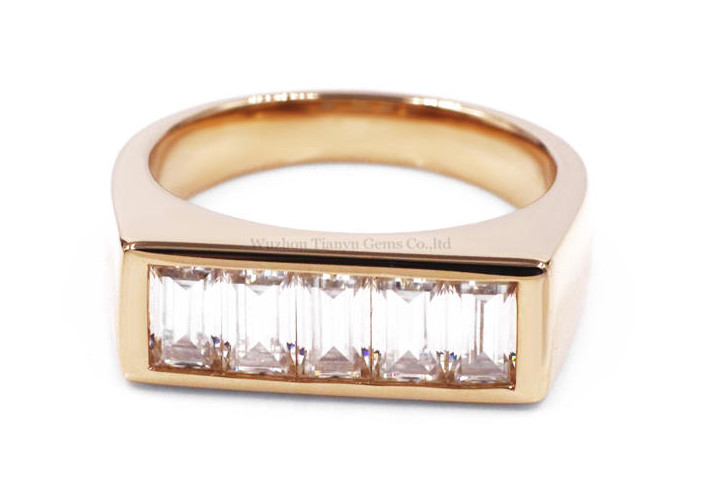
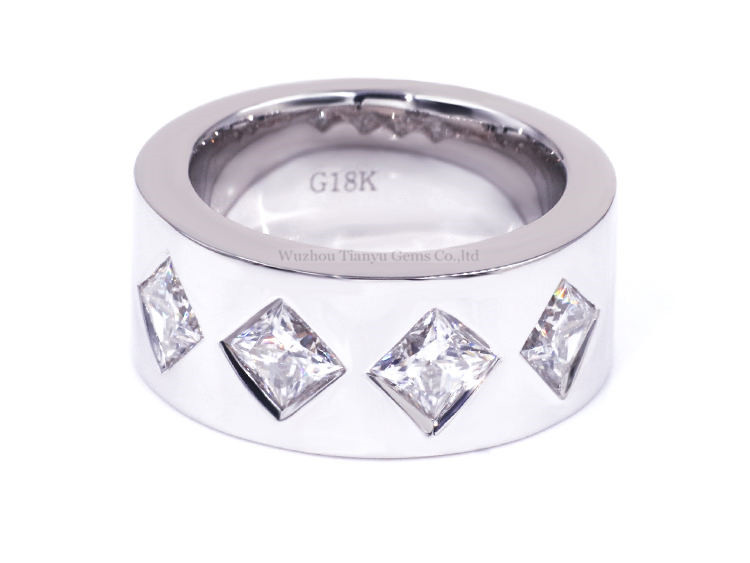
Channel setting: Perfecting the art of setting stones in a row
Channel setting involves setting stones in a row, held in place by metal channels on either side. This technique creates a sleek and modern look, often used in wedding bands, bracelets, and other jewelry pieces.
To begin, gather the necessary tools and materials: gemstones, metal channels, a jeweler's saw, files, and a torch. Start by measuring and marking the position of the channels on the metal base. Use a jeweler's saw to create notches for the channels to sit in. Carefully fill and shape the channels to ensure a secure fit.
Next, place the gemstones in the channels, making sure they fit snugly and are evenly spaced. Use a jeweler's hammer to gently tap the metal over the stones, securing them in place. Once all the stones are set, file and polish the metal to achieve a smooth and professional finish.
Channel settings are ideal for creating a sleek and uninterrupted row of gemstones. They provide a secure and durable setting while allowing the stones to catch the light from all angles.
Flush setting: Achieving a seamless and contemporary design
For a seamless and contemporary look, the flush setting is an excellent choice. This technique involves setting the gemstone directly into the metal surface, so it sits flush with the surrounding metal. Flush settings are commonly used in wedding bands, earrings, and other jewelry pieces where a clean and minimalist design is desired.
To create a flush setting, start by drilling a hole in the metal surface where the stone will be placed. The hole should be slightly smaller than the diameter of the stone. Next, carefully position the stone within the hole, ensuring it sits flush with the metal surface. Gently push the metal around the stone, using a setting tool to secure it in place. Finally, file and polish the metal surface to achieve a seamless finish.
Flush settings offer several advantages. They create a clean and minimalist look, as the gemstone sits flush with the metal surface. Additionally, flush settings provide excellent protection for the stone, as it is securely held within the metal. However, it's important to note that flush settings require precision and attention to detail, as any imperfections in the metal surface can affect the overall look of the setting.
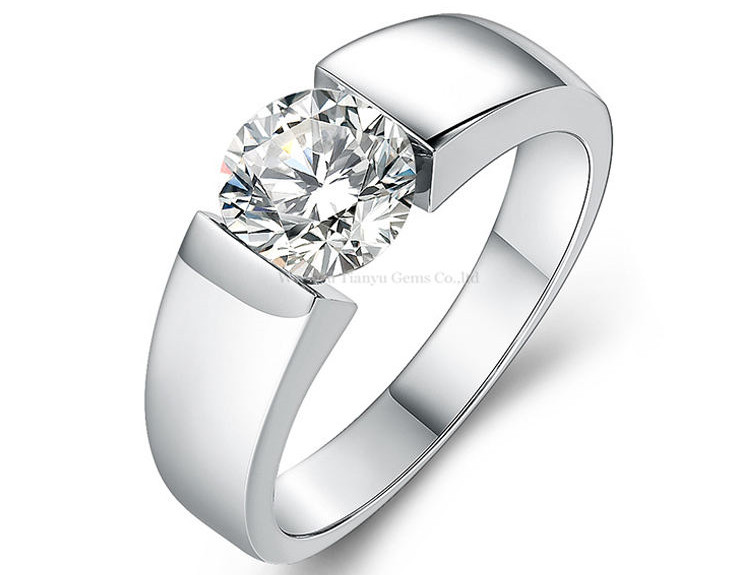
Tension setting: Creating the illusion of a floating stone
If you're looking to create a unique and eye-catching stone setting, the tension setting is the way to go. This technique involves suspending the gemstone between two pieces of metal, creating the illusion of a floating stone. Tension settings are commonly used in modern and contemporary jewelry designs, where the emphasis is on showcasing the beauty of the stone.
To create a tension setting, start by selecting two pieces of metal that will hold the stone in place. These pieces should be slightly curved and fit snugly against the sides of the stone. Next, carefully position the stone between the two metal pieces, ensuring it is securely held in place by the tension between them. Gently push the metal pieces together, using a setting tool to ensure they are tightly secured. Finally, check that the stone is securely held and make any necessary adjustments.
Tension settings offer several advantages. They create a unique and modern look, as the gemstone appears to be floating within the setting. Additionally, tension settings allow for maximum light exposure, enhancing the brilliance of the stone. However, it's important to note that tension settings require precise measurements and careful craftsmanship, as any miscalculations can result in damage to the stone or the setting.
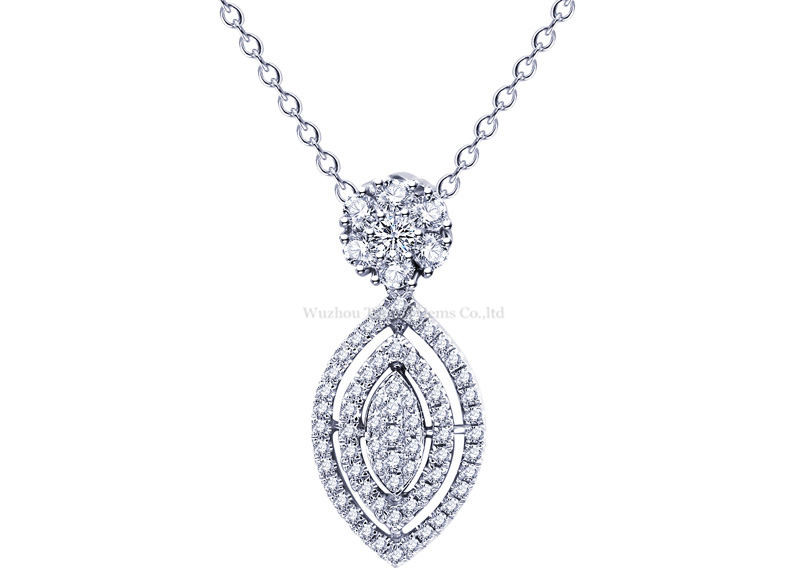
Cluster Setting
Cluster setting is a technique where multiple small gemstones are grouped closely together, creating the appearance of a larger, more substantial stone. Here's a guide to help you master cluster setting:
Selecting Gemstones:
Choose small gemstones that complement each other in color, shape, and size.
Consider a mix of gemstone shapes to create visual interest in the cluster.
Design Planning:
Plan the layout of the cluster on the jewelry piece.
Experiment with different arrangements to find the most visually appealing design.
Prepare the Metal Surface:
Ensure that the metal surface is clean and well-prepared for setting.
Smooth and polish the metal to enhance the overall appearance of the cluster.
Create Individual Seats:
Use a setting bur or drill to create individual seats for each gemstone.
The seats should be carefully spaced and shaped to accommodate the chosen gemstones.
Secure Gemstones in Seats:
Gently place each gemstone into its designated seat.
Use a prong pusher or burnisher to secure the metal over each gemstone, holding it in place.
Adjust for Symmetry:
Regularly check for symmetry and balance in the cluster.
Adjust the position of individual stones to achieve a harmonious arrangement.
Consider the Overall Shape:
Pay attention to the overall shape of the cluster.
Aim for a cohesive and balanced arrangement that complements the jewelry design.
Use Proper Tools:
Utilize specialized tools for cluster setting, including prong pushers and burnishers.
Ensure the tools are suitable for the size and shape of the gemstones.
Secure Settings:
Confirm that each gemstone is securely set in its individual seat.
Check for any gaps between the metal and the gemstones.
Finishing Touches:
Use a burnisher to smooth the metal around each gemstone.
Remove any excess metal or sharp edges for a polished appearance.
Consider Metal Characteristics:
Be mindful of the metal's properties, as different metals may require different setting techniques.
Choose a metal that enhances the overall aesthetic of the cluster.
Quality Control:
Regularly inspect the cluster setting for tightness and security.
Confirm that all gemstones are securely set and evenly spaced.
Clean and Polish:
Clean the piece thoroughly to remove any residues.
Polish the metal surface to achieve a finished and professional look.
Practice Patience:
Cluster setting requires precision and attention to detail. Take your time to achieve the desired results.
Regular practice will improve your ability to create visually stunning and secure cluster settings.
Cluster setting offers a versatile way to showcase multiple gemstones in a single design. By mastering this technique, you can create intricate and captivating jewelry pieces.
Bead setting
Bead setting, also referred to as pavé setting, is a sophisticated jewelry technique in which small metal beads or prongs are employed to secure gemstones closely together, forming a continuous surface of stones. This method is commonly utilized for small diamonds or other precious gemstones. Here's an optimized guide to help you understand and master bead setting:
Gemstone Selection: Choose small, uniformly sized gemstones for bead setting. Common choices include diamonds, sapphires, or other durable stones.
Prepare the Metal Surface: Ensure that the metal surface is clean, smooth, and well-prepared for setting. Polish the metal to achieve a high-quality finish.
Design Planning: Plan the layout of the gemstones on the metal surface. Consider the overall design and the desired pattern for the bead setting.
Creating Seats for Gemstones: Use a setting bur or drill to create small seats or divots for each gemstone. The seats should be evenly spaced and shaped to accommodate the chosen gemstones.
Placing Gemstones: Gently place each gemstone into its designated seat. The gemstones should sit closely together, with minimal space between them.
Creating Beads: Use a graver or bead-setting tool to push metal over the edge of each gemstone, creating small beads or prongs. These beads secure the gemstones in place while leaving a minimal amount of metal visible.
Aligning and Leveling: Regularly check for alignment and levelness of the gemstones. Adjust the position of individual stones to achieve a symmetrical and balanced appearance.
Use Proper Tools: Utilize specialized bead-setting tools, such as gravers and beading tools. These tools are designed to create precise beads and ensure a secure setting.
Securing Settings: Confirm that each gemstone is securely set in its seat. Check for any gaps between the metal and the gemstones.
Finishing Touches: Use a burnisher to smooth the metal around each bead. Remove any excess metal or sharp edges for a polished appearance.
Consider Metal Characteristics: Be mindful of the metal's properties, as different metals may require different setting techniques. Choose a metal that complements the gemstones and the overall design.
Quality Control: Regularly inspect the bead setting for tightness and security. Confirm that all gemstones are securely set and evenly spaced.
Clean and Polish: Clean the jewelry piece thoroughly to remove any residues. Polish the metal surface to achieve a finished and professional look.
Split prong setting
Split prong setting is a jewelry technique where a gemstone is securely held in place by prongs that gracefully split into two or more branches. This setting style not only ensures the stone's stability but also introduces a captivating design element, allowing enhanced light exposure to showcase the gem's brilliance. Here's a detailed guide to help you comprehend and perfect the art of split prong setting:
Gemstone Selection:
Choose a gemstone that aligns with the characteristics suitable for a split-prong setting, typically favoring stones with exceptional clarity and brilliance such as diamonds.
Metal and Prong Selection:
Select a metal, commonly gold or platinum, that complements the chosen gemstone. Ensure the prong wire's thickness is appropriate for both durability and aesthetic appeal.
Design Planning:
Strategically plan the arrangement of split prongs around the gemstone, considering factors like the number of prongs and their placement to achieve balance and symmetry.
Prepare the Metal Surface:
Before initiating the setting process, guarantee that the metal surface is impeccably clean, smooth, and prepared for the setting. A polished metal surface contributes to a high-quality finish.
Creating Prong Seats:
Use a setting bur or drill to carve out small seats within the metal to accommodate the split prongs. Ensure even spacing and precise shaping for optimal prong placement.
Forming Split Prongs:
Cut the prong wire into suitable lengths for creating split prongs. Employ pliers or a forming tool to delicately split each prong into two or more branches.
Placing Gemstone:
Carefully position the gemstone into its designated seat. Surround the gem with the split prongs, ensuring a snug and secure fit.
Securing the Gemstone:
Utilize a prong-pushing tool to gently press each split prong over the gemstone. Apply even pressure to every prong, ensuring a secure and balanced setting.
Checking for Alignment:
Regularly assess the alignment and levelness of the gemstone within the split prongs. Make adjustments to attain a symmetrical appearance.
Finishing Touches:
Use a burnisher to smooth the metal around each split prong, removing any excess metal or sharp edges for a polished and refined look.
Consider Metal Characteristics:
Be mindful of the metal's properties, selecting a metal that complements both the gemstone and the overall design of the jewelry piece.
Quality Control:
Conduct regular inspections of the split-prong setting to ensure tightness and security. Confirm that all prongs are securely set and evenly spaced.
Clean and Polish:
Thoroughly clean the jewelry piece to eliminate any residues. Polish the metal surface to achieve a finished and professional appearance.
Tips For Selecting The Right Stones For Your Setting
When choosing gemstones for your stone settings, it's important to consider their durability, color and cut. Different gemstones have varying hardness and durability, so it's essential to select stones that can withstand the wear and tear of daily use.
Consider the color and clarity of the gemstones, as they will greatly impact the overall appearance of the piece. The cut of the stones also plays a significant role in their sparkle and brilliance. Choose stones with well-cut facets and excellent light reflection for maximum impact.
It's also important to consider the size and shape of the stones in the setting. Larger stones may require prong or bezel settings, while smaller stones can be set using pavé or channel settings. Experiment with different combinations to create unique and eye-catching designs.
Tools And Equipment Needed For Stone Setting
To achieve precise and secure stone settings, you'll need a range of tools and equipment. Here are some essential items to have in your jewelry crafting arsenal:
1. Jeweler's saw and blades: Used for cutting metal and creating notches for prongs or channels.
2. Needle files: Essential for filing and shaping metal to achieve a precise fit.
3. Torch: Used for soldering and heating metal during the stone setting process.
4. Pliers and tweezers: For holding and manipulating small components and stones.
5. Burnishers and gravers: Used for smoothing and polishing metal around the stones.
6. Gemstone setting tools: Including burins, setting tools, or pushers for securely placing the stones in their settings.
Investing in high-quality tools will greatly enhance your stone-setting techniques and ensure professional-level results. Regular maintenance and sharpening of your tools will also prolong their lifespan and effectiveness.
